Light Conversation — Maintenance
Removing the Bottom of Our Crystal Chandeliers 2
One of our most common "how do I's" is how do I remove the bottom of my crystal chandelier. We made a little video for our YouTube channel that is linked here.


These instructions are general. Keep in mind that chandeliers are built by hand and installed by human beings and are all different. What works for one may not work for another.

- King's Chandelier Company
- Tags: Chandelier Cleaning Tips Chandelier Parts How do I... Maintenance Restoration Files
Clips and Pins for Repairing Your Chandelier Crystals 0
It has been a while since we added parts to the website, but we've updated it with a good selection of pins and clips for your re-pinning needs.
Click here to read some about the different types of pinning on our blog.
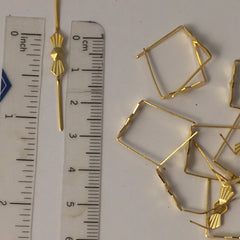
The measurements listed for the clips and hangers are the face measurement and do not include the length of the "legs" (the part that inserts into the holes of the crystals). Using the example above, the bowtie clip is measured as 13mm.
This face measurement is what will determine the distance between the two pieces of crystal that are being re-pinned. A 13mm bowtie will leave less than 13mm between the 2 pieces. Exactly how much will depend upon the size of your crystals, but there is a 9mm space using the 13mm bowtie between the two 16mm crystals in this example below.

The "leg" of the clip is the part that goes into the hole on the piece of crystal. In the photos below, you can see the difference between the "long legged" clip and the regular clip. The long legged clips are excellent for clipping into large crystals.

If you are in doubt about which type or size of clip to use, please email us. We will be happy to help you.
- King's Chandelier Company
- Tags: Chandelier Parts Maintenance Restoration Files
Putting together pieces for your crystal chandelier... 2
Have you spent hours trying to determine what you need to buy in order to put together a strand of crystals for your chandelier?
Rather than you trying to purchase all the necessary little pieces in bulk and assembling something yourself, let us do the work.

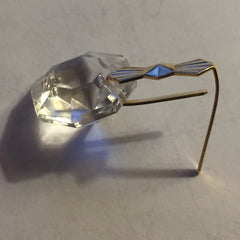
You can send us a photo of exactly what you need. This customer placed his crystal piece on a ruler, but he also gave us the dimension of each piece. We were able to duplicate his crystal strand and his chandelier looks good as new.
How to measure the pins between the crystal? Don't measure the "legs" (pieces that goes into the crystal), just simply measure the decorative part that shows between the crystals.
It can be difficult to match some things exactly - the thickness of a piece of crystal may be slightly different, or the cut may vary a tiny bit. But, we are experts! We will let you know if there are any differences and if we think it will be noticeable.
email: crystal@chandelier.com.
- King's Chandelier Company
- Tags: Chandelier Parts FAQ Maintenance Restoration Files Tools of the Trade
Tools of the Trade - Needle Nose Pliers 0
We couldn't be crystal chandelier makers without these little guys! If you want to tackle any crystal pinning or re-pinning project, you will need these pliers. And, they are great to have on hand for small bits of repair work.
The best ones have a medium length nose. If the nose is too long and slim, you will have difficulty manipulating harder pins. If the nose isn't slim enough, you will be unable to grip the tiny pin heads.
Here is my perfect pair of needle nose pliers:

These have a built-in cutting edge for cutting pins and handles that spring making for easy grip. I personally like the soft covered handles, though others like the harder covered handles. Around here, we tend to put our name on our favorite tools!
You can purchase these types of pliers in the tool section of most hardware stores. You can also find them in hobby stores in the jewelry making department.

Happy pinning!
-Nancy
- King's Chandelier Company
- Tags: Maintenance Our Favorite Things Restoration Files Tools of the Trade
Tools of the Trade - Colander 0
When cleaning a chandelier, what do you do with all of those little crystal parts that come from the chandelier?
If you read our cleaning instructions, you will see us mention placing them in a colander - preferably a plastic one ... or two ... or three depending upon how many crystal pendants your chandelier holds.
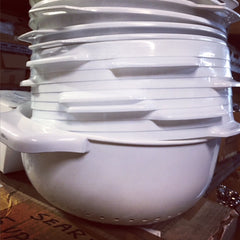
Because plastic is softer than metal and won't damage the crystal, we recommend plastic colanders. They are relatively cheap and available.
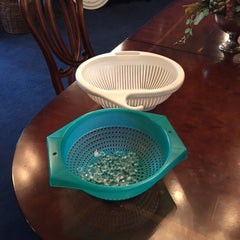
As you remove the crystal pendants from your chandelier, place them in the colander. Don't fill it too full; you will get the best results with less than a third full. Sparingly, sprinkle your dish washing liquid (or whatever you want to use for cleaning your chandelier) over the crystals and place the colander directly under your water stream to rinse using hot water.
Once the water runs clear, you can set your colander on a towel and begin wiping the crystals dry. As you wipe each one, place it on the towel. Once all are done, place a layer of paper towels into the bottom of the colander. This paper towel will keep the hooks from getting stuck in the holes. You can also layer your crystal with paper towels if you like. Place your pendants back into the colander and rehang them on your chandelier.
Happy Cleaning!
- King's Chandelier Company
- Tags: Chandelier Cleaning Tips Maintenance Tools of the Trade
Tools of the Trade - Roundnose Pliers 0
How do you get those little crystal pins between your chandelier crystals round? With roundnose pliers! We call these curling pliers because we use them primarily to make the pins curl around each other when connecting crystals together.

These have smooth grippers with nothing to leave a mark, and the tips graduate for options on sizing your loops. These are the perfect tool for reworking or repairing any pinning between crystals or on your chandelier.
If you can't find them in the tool section of your hardware store, you may be able to find them in the jewelry marking section of a craft or home store.
- King's Chandelier Company
- Tags: Maintenance Our Favorite Things Tools of the Trade
