Light Conversation — Chandelier Parts
Lamp Repair - We do it! 0
If you follow our facebook and Instagram pages, you know that we love to repair lamps. Why throw out your old lamp just because it doesn't work? Never do that!
Most lamps are pretty uncomplicated, and it is quite easy to change out the wire or the socket, or both in order to make them safe for use.
Make your single way lamp into a 3 way lamp simply by changing the socket, but make sure to stay true to the original wattage limits. Most frequently these are due to the type and size of the shade that is on the fixture.
Sockets switches can be turn knobs, keys, push thrus, and even pull chain. Whatever suits you.
Change the location of your switch. Switches don't have to be on the socket. Rotary switches and step on switches can be placed on cords. And, speaking of cords, they can be made shorter or longer to blend in with their surroundings.
A good lamp repair store will have options to replace many types of lamp bases and will clean your lamp inside and out as needed.
A new shade will always spruce up an old lamp, and if you can't find the right size, consider switch the harp out to one that will accommodate the size of shade that is available to you.
Adding a new lamp finial is the perfect way to crown your newly refurbished lamp. Or add your own personality to an otherwise boring lamp by choosing a fun lamp finial. Which brings me to the reason for today's blog.... we are adding lamp finials to our web site! Yay! (My fave is the pineapple lamp finial!)
- King's Chandelier Company
- Tags: Chandelier Parts Our Favorite Things
Removing the Bottom of Our Crystal Chandeliers 2
One of our most common "how do I's" is how do I remove the bottom of my crystal chandelier. We made a little video for our YouTube channel that is linked here.


These instructions are general. Keep in mind that chandeliers are built by hand and installed by human beings and are all different. What works for one may not work for another.

- King's Chandelier Company
- Tags: Chandelier Cleaning Tips Chandelier Parts How do I... Maintenance Restoration Files
Clips and Pins for Repairing Your Chandelier Crystals 0
It has been a while since we added parts to the website, but we've updated it with a good selection of pins and clips for your re-pinning needs.
Click here to read some about the different types of pinning on our blog.
The measurements listed for the clips and hangers are the face measurement and do not include the length of the "legs" (the part that inserts into the holes of the crystals). Using the example above, the bowtie clip is measured as 13mm.
This face measurement is what will determine the distance between the two pieces of crystal that are being re-pinned. A 13mm bowtie will leave less than 13mm between the 2 pieces. Exactly how much will depend upon the size of your crystals, but there is a 9mm space using the 13mm bowtie between the two 16mm crystals in this example below.

The "leg" of the clip is the part that goes into the hole on the piece of crystal. In the photos below, you can see the difference between the "long legged" clip and the regular clip. The long legged clips are excellent for clipping into large crystals.

If you are in doubt about which type or size of clip to use, please email us. We will be happy to help you.
- King's Chandelier Company
- Tags: Chandelier Parts Maintenance Restoration Files
Putting together pieces for your crystal chandelier... 2
Have you spent hours trying to determine what you need to buy in order to put together a strand of crystals for your chandelier?
Rather than you trying to purchase all the necessary little pieces in bulk and assembling something yourself, let us do the work.

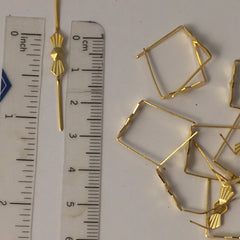
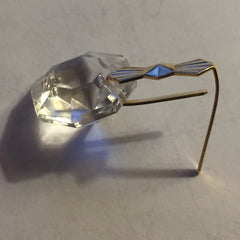
You can send us a photo of exactly what you need. This customer placed his crystal piece on a ruler, but he also gave us the dimension of each piece. We were able to duplicate his crystal strand and his chandelier looks good as new.
How to measure the pins between the crystal? Don't measure the "legs" (pieces that goes into the crystal), just simply measure the decorative part that shows between the crystals.
It can be difficult to match some things exactly - the thickness of a piece of crystal may be slightly different, or the cut may vary a tiny bit. But, we are experts! We will let you know if there are any differences and if we think it will be noticeable.
email: crystal@chandelier.com.
- King's Chandelier Company
- Tags: Chandelier Parts FAQ Maintenance Restoration Files Tools of the Trade
Adding Crystal to Your Plain Chandelier 0
Do you have a plain chandelier that you would like to dress up a bit? Add some fun crystal to it? We love that idea! Below are two metal chandeliers to which crystal pendants and strands were added for a lovely look.


Of course, the big question is how do I do this? How do I add crystal to my light fixture?
Some fixtures are manufactured with holes in the stampings or metal parts, but the added crystals are not included in the design of the fixture. In that case, it is easy to add.


If your fixture does not have any holes, you will need to create some. Our favorite way to do this is with a punch plier:


Depending upon the material, you may be able to use other tools. If you can't seem to make holes with any tools, then you can use a thin piece of wire to wind around different parts of the chandelier. Leave the wire loose enough for a hook to slip through.
We think it is fun to vary the size of the pendants you are adding, but we recommend having the same size on one level. In other words, the pendants hanging from the front of each arm should be the same, but they can be a different size or shape from the pendants hanging on the top of the chandelier. And, the ones on the top should be all the same (or alternating with another style). A pattern should emerge rather than every thing being random.
This customer was able to unscrew the candle holders from the body of this beautiful silver candelabra in order to add bobeches and prisms.

Shop our collection of chandelier pendants for ideas on what might look best on your chandeliers. Or, feel free to email us a photo, and we will make suggestions.
- King's Chandelier Company
- Tags: Chandelier Parts Room Ideas
Different Types of Pinning for the Crystals on a Chandelier 4
All the little pieces of crystals connect to each other using wire, but there are different methods of making these connections. We call this chandelier pinning and there are 3 prominent styles: Swedish, Traditional (aka Wrinkle) and Clips.
A crystal that has Swedish pinning will have one long piece of wire strung into the holes of the two pieces of crystals that are to be connected. This one piece of wire is then wound around itself.

Usually a fixture that has this type of Swedish pinning will utilize the same pinning method to connect the crystals to the body of the chandelier - making cleaning a fixture like this more time consuming.
Traditional or Wrinkle pinning is similar to Swedish, but uses 2 pins - one pin per crystal hole. These pins look like straight pins when purchased.

As you can see above, the pins are looped into a circle with curling pliers and turned perpendicular to each other. Then, they are wound together - similar to 2 split rings. Usually, they are then simply hooked, with the same type of pin bent into a hook, to a chandelier.
The more modern way to pin crystal is to use Clips. Like a staple, one end of a clip goes into the hole of one piece of crystal and the other end of the clip goes into the next crystal.

The above photo shows plain clips, but some clips look like bowties and are called Bowtie clips.
Visit our YouTube channel for tutorials on pinning.
- King's Chandelier Company
- Tags: Chandelier Parts
